Tech Help questions and answers below.
We will be happy to answer questions about the engine we sold you, but please remember we build engines not cars. We spend a lot of time Installing warning tags on all parts of your engine don’t cut the Zip-tie off until you have completed that item. If you are thinking you have gotten over your head, then stop and consult an installer.
1. What’s the best way to lift the engine?
If the lifting points are Accessible, pickup diagonally from the front Left or Right Front Cylinder Head to the Rear Left or Right Cylinder Head. Otherwise from exhaust port holes in the cylinder Heads. Use a high grade Bolt that does not stick out more than a ½ inch otherwise it will bend up and snap off from the chain or cable causing the engine to fall . USE a heavy duty chain or cable long enough to prevent scratching the Valve covers or damaging the Air Cleaner. Never stand under an engine that is suspended in the air, always ask yourself if it falls where will I be.
2. What grade Oil do you recommend and how often should I change the Oil?
We normally suggest using a high Grade SAE 10W/30 Motor oil along with a ½ pint of a good quality zinc break in oil. After 2 oil changes if you would like to go with a synthetic or blended version then this is O.K. Do an initial oil change after 500 Miles then just every 3000 miles from there. Note on the first oil change your oil will look blacker than normal this is because when we assemble the engine we use a heavy duty Graphite on all Moving parts. Many people will ask how many quarts of oil does my engine hold. We have to tell you that every engine is a little different because we install the oil pan that is Made for the application, many will only take 4 quarts and some as many as 8 quarts. Here is how we want you to do it, on initial oil and filter change, first fill the new oil filter to the top, Then install 3 quarts of oil in the engine, then count how many additional quarts does it take to reach the full mark on the Dipstick, caution do not overfill.
We use Wix Oil filters #51069 on our most popular Chevy engines.
We use WIX oil filters # 51085 on our most Popular Ford engines
3. Engine Break in and Distributor Gear Warning!
Engine Factory will normally do the break in of the camshaft on our Turnkey engines. This is very important because you have to be aware that your distributor gear is Matched to the Camshaft in your engine. You cannot go switching the distributor unless you purchase a complete distributor with a Melanized drive gear. Upon taking your vehicle on the road for the first time stagger the throttle from 30 to 50 MPH several times to get the Piston Rings seated properly. Keep the RPMs under 4000 RPMs for the first 1000 miles.
4. What is the max Redline RPM on this engine?
Keep them under 5800 RPMs. The power starts to drop above this anyway in most Street Engines. You will have all the power you’ll ever need below this level anyway. Going beyond this definitely increases your chances of damaging internal Parts.
5. Your engine runs warm this help
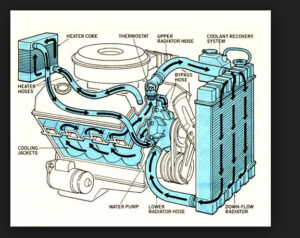
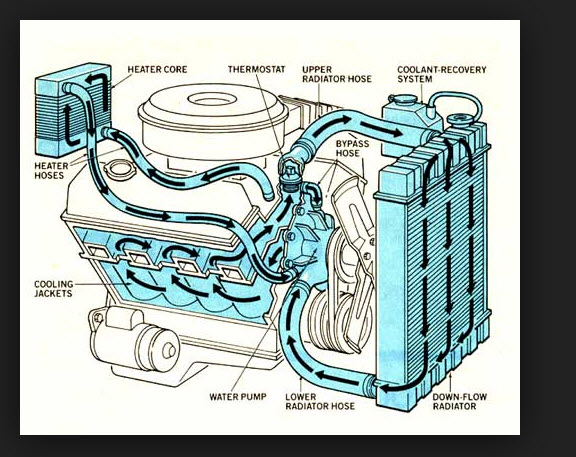
1. Help on any engine running warm First study a typical coolant flow in attachment above.
2. Use a Stant #2000-160 it has a little air vent Hole built into thermostat it allows air to get out of block. put the air pintle at 12:00 o'clock position.
3. Install your temperature sender in the Intake water port, ON Chevy’s put it in the Left cylinder head.
a)Do not put sender in the thermostat housing it give a false reading those ports are for vacuum switches.
4. THIS IS THE BEST ELECTRIC FAN IT HAS A THERMOSTATIC ADJUSTABLE SWITCH THAT THE PROBE JUST PUSHES THREW
- THE RADIATOR CORE NO TEMPERATURE SWITCH NECESSARY. Part # FLX-185 Order by model www.summitracing.com
- Be sure to Installed to pull air through the Radiator on certain cars they can be mounted to push air through
- The radiator. It pushes 3,000 Cfm’s through the radiator set it to come on at about 170 degrees, we use
- This system, when we test our engines most of our engines run about 180 degrees, wire fan with a 10 gauge wire.
5. Many late model Fords and GM that use a single belt serpentine system use a reverse turn water pump be careful
- If a water pump has been replaced also be sure if you are using a thermostatic fan clutch be sure that the fan
- Is pulling air through the radiator an easy test is to put a newspaper on the front of the radiator it should pull
- Tight up against the radiator, of course your radiator must feel warm from top to bottom to be sure it is cooling Properly.
6. Here is a handy item that mounts at the highest point on your upper radiator hose cut the upper hose and install this Moroso # 63730 filler neck be sure to use with a 16 Lb. radiator cap it allow you to easily be sure the entire block is filled. Also available at www.summitracing.com
6. Best way to Set Your timing the way Racers do
Clean Off the timing pointer.
Clean off the Balancer we usually mark 15 and 34 degrees on it.
Warm up engine
Hook up your timing light.
Pull vacuum line off the distributor vacuum advance.
Bring RPM’s up to 3,000 and hold steady.
The Mark on your timing pointer should line up with the 34 degree mark on the Balancer.
Adjust if necessary.
Hook up the vacuum advance hose, timing will be correct at all rpm’s
We hook up the vacuum advance this way because it helps to give a much better throttle
Response and a better idle.
7. How do I wire my Small Body Distributor?
Ignition Module for Ford 3 wire distributors from www.summitracing.com
If your vehicle has lost spark you may need this Module #850206-1, it fits Summit distributor #850303-1
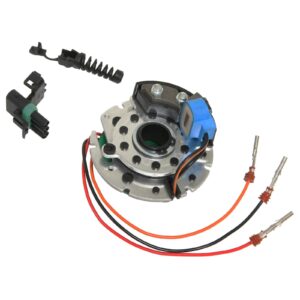
Your Electronic small body Distributor will have 3 wires coming out of it:
- Red goes to Positive on the Coil
- Orange wire goes to Negative on the Coil
- Black goes to Ground.
You need 12 Volts Coming from your Ignition switch, both Crank and run position, that works on and off with the Key.
Also, a word of warning, never hook up an electric fan on the same wire that powers your distributor, it must be on a separate circuit coming from your fuse box. Here is what can happen if you shut off the engine and fan is still spinning it acts like a generator and sends a voltage spike back to your Distributor and it can burn out the module in the distributor giving you a no spark condition.
8. One Wire Alternators
The CSI ( Charging Circuit Integrated ) alternators that we use are 140 Amp, They are used around the world. they only require a 6 gauge wire from the Alternator to the Positive terminal on Your Battery, no other wires or plugs should be used. There are so many Aftermarket wire harnesses’ out there most of them are universal Harnesses, they should not be hooked up to a ( one wire Alternator ) These CSI Alternator systems are Isolated and work on their own.
Just run a 6 gauge wire from the terminal with the nut on the alternator to the positive Battery terminal the engine will start and charge the Battery at 14.2 volts. you will need to hook up a separate voltmeter under your dash to monitor your charging system.
You should also be sure when they installed your engine, that your engine must have a 4 gauge heavy duty ground wire from the engine block to the vehicles frame.
9. How do I hook up my starter and solenoid wiring on FFR vehicles
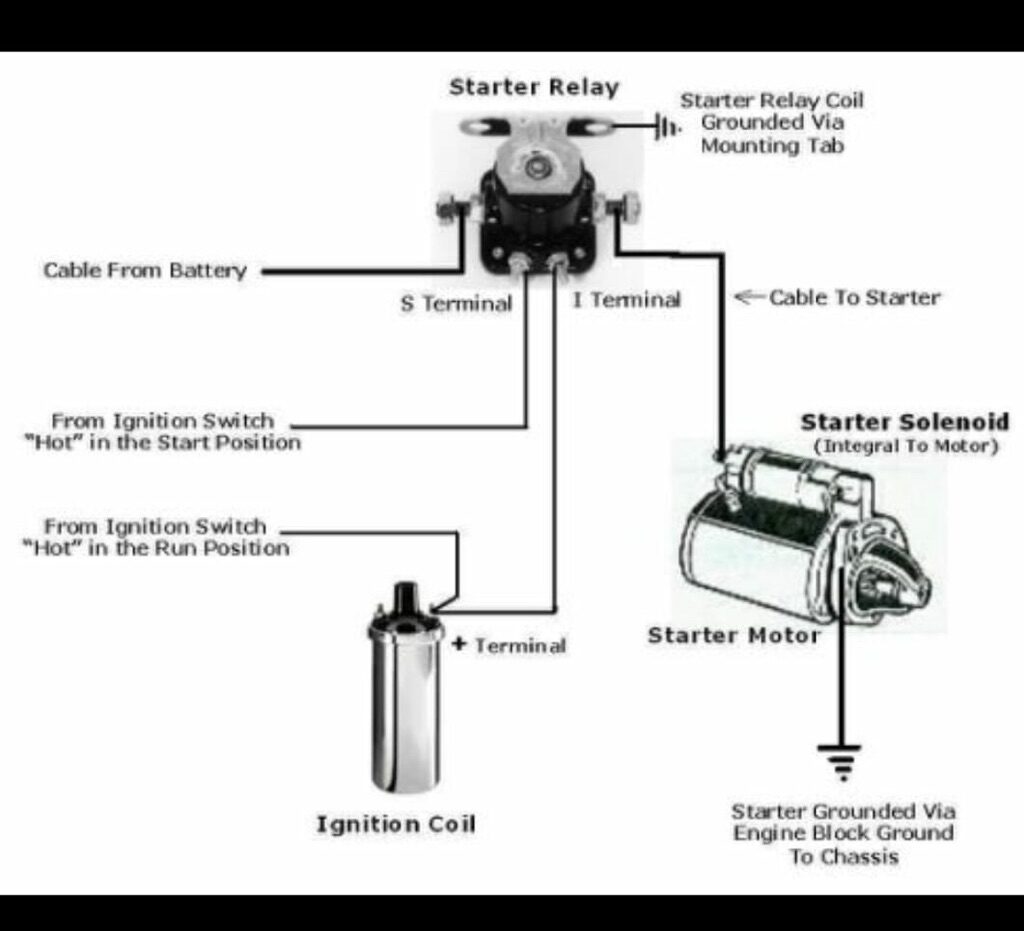
Click image to enlarge
10. When going from a Points style distributor you need to wire an HEI distributor differently
GM HEI wiring terminals
Here are the part Numbers you can order from www.summitracing.com although most auto parts store will also have them many different brands >>>> be sure to tell the guys the Power lead must be hooked up to the Ignition terminal so that the distributor has 12 volts with the key on and no voltage with the key off. Never hook up to the same wire that powers an electric fan or the automatic choke
Painless Wiring 30809 - Painless Performance HEI Power Pigtails
Compare
HEI Power Pigtail, GM HEI Distributors, Each
Part Number: PRF-30809
Painless Wiring 30813 - Painless Performance HEI Tachometer Lead Pigtails
Compare
Wiring Harness, HEI Tachometer Lead, 6 ft. Length, Each
Part Number: PRF-30813
11. Electrical issues many people don’t do and have constant electrical issues.
Very important to follow these instructions:
Distributor and Electric Choke positive terminals must be hooked up to separate 12 volt key controlled (on and off with key ) If you use an electric fan it must be hooked up to a separate circuit otherwise it can burn out the ignition module in the distributor. Here is why if you shut the vehicle off and the fan is still spinning the fan acts like a generator and sends back a voltage spike that instantly burns out the Ignition Module in the distributor.
Also be sure to have a heavy duty 4 Gauge Ground cable going from the engine block to the vehicle frame otherwise you will constantly be adding water to your battery and your alternator will be spiking voltage at 18 volts.
Most auto parts stores have a simple piece that plugs into your fuse panel and adds 4 separate key controlled circuits that plugs into the accessory circuit.
12. Tech Help For Spark Plugs Fouling Out, And Or Raw Gas Smell Out Of The Tail Pipe
In about 90 % of the cases it usually comes down to two issues, It can be the choke is Binding or it has not been wired correctly, the electric choke must have 12 volts whenever the engine is running. Start with the engine cold overnight, push the gas pedal to half throttle to set the choke it should snap shut, now let’s remove the air cleaner Lid only, look to see that choke butterfly is now closed, check to see if it is opening and closing smoothly by pushing the top butterfly open and closed with your finger it should open and close easily without any binding, sometimes we have to use a plastic spacer for the Air cleaner to clear the Distributor they are very touchy if they are not put back on correctly they will bind up the choke mechanism, now start the Vehicle it should go on fast idle and the choke will start to open fully after about 10 minutes of running, If not have a certified mechanic check and repair as necessary.
Another more serious problem is you Have picked up a piece of dirt Or rust in the Carburetor Needle and seats which cause the carb to dump raw gas into the intake, if you have an old fuel tank 10 Years or older by now over the years the tank has collected small amounts of water which turns to rust, water is heavier than fuel so the water and rust settles to the bottom of the tank and is pumped into your Carb or fuel injectors causing a Major flooding problem. If that is the case you will have to have a professional remove the carb and have the needle and seats cleaned by a professional Carb person, or in the case of fuel injectors those would have to be replaced. Engine Factory always recommends replacing a gas tank that is 10 years or older, go online Holley has a good selection of new fuel Tanks
13. Installing Torque converters a must read
Over the years One question that get asked very often How do I know if I have installed my automatic Trans Torque converter Properly?
Now let me say this We are engine Builders Not Transmission builders But over the Years of building our own Cars we learned the right way and the wrong way about installing torque converters on a freshly Built Transmissions, we have found the following Method has always worked well for us.
The first thing Be sure when you order the Torque Converter tell the trans person what Camshaft and Horsepower you have. Are you building a cruiser or Hot street machine because this will determine what stall speed you want for the converter, Most cruisers will stay with a 2,000 stall speed, 400 HP around 2,500, 500 HP & Up will go with 2800 Stall Speed of course if you know your rear end ratio also give that to Transmission shop.
Now when you order your torque converter best to order the converter that has multiple bolt holes where the converter mounts to the engine flexplate, most performance converters normally have the multiple bolt holes.
Ok now when you’re ready to put the converter onto the Trans we always recommend take a look down in the converter and see if you see any trans fluid pour in 1 quart It is best so that it has some lubrication and helps to pick up the pressure faster, now look at the front seal if it looks ok then spread a little of trans fluid on the converter shaft just so the seal has instant lubrication so you don’t burn the seal lips. Now pick up the converter and slide over the trans splined shafts, slowly push into the Transmission and keep rotating the converter you will see it drop back a little that shows it went onto the 1st set of splines now keep turning and pushing back it will then drop back one more time and that means you have dropped back on the second set of splines and have engaged into the Transmission front pump give the converter a spin there should be a nice smooth spin no binding or noise.
Now it is time to mate the Transmission to the Back of your engine, first make sure the Pins that the Transmission line up on don’t have any paint on them, also make sure that the Transmission alignment holes are nice and clean. Now take a couple of Extra 3 inch long bolts and cut the heads off, just thread them into the back of the engine by hand about 3 full turns this will help you to easily slide the trans onto the back of the engine, now have your trans bolts ready to install thread them in by hand and use a hand ratchet, you will now see that the face of the trans and the block are mated together. Now very important reach under and try to spin the torque converter, If you can that means success you now know the Torque converter is installed in the trans correctly, so now is the time to install your converter to flexplate Bolts, you should have about ¼ of an inch space between converter and flexplate that’s perfect, now pull the converter forward until it lines up flush with the flexplate, now install your torque converter bolts nuts and lock washers and torque up everything, now Ford converter use the same procedure except the ford converter have studs that you have to spin the converter to line up the holes into the flexplate. Always be sure you use a new Trans cooler.
14. Intake Power Brake Connection
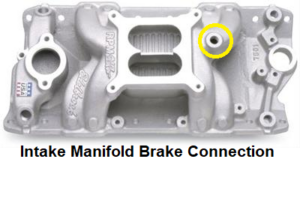
The image above shows where you hook up power brakes.
you will need these fittings Edelbrock Number 8096 and Edelman # 846260 Order both from
www.summitracing.com There are many other places on the Carb, look at 2nd attachment.
to hook up a vacuum hose going down to the Transmission it needs Vacuum all the time.
These items should be left to a certified mechanic.
15. Tech Help on any engine that runs warm
- Help on any engine running warm First study a typical coolant flow in attachment above.
- Thermostat Use a Stant #2000-160 it has a little air vent Hole built into thermostat it allows air to get out of block. put the air pintle at 12:00 o Clock position.
- Install your temperature sender in the Intake water port, ON Chevy’s put it in the Left cylinder head. Do not put sender in the thermostat housing it give a false reading those ports are for vacuum switches.
- THIS IS THE BEST ELECTRIC FAN, IT HAS A THERMOSTATIC ADJUSTABLE SWITCH THAT THE PROBE JUST PUSHES into THE RADIATOR CORE Part # FLX-185 Order by model summitracing.com be sure to Install it to pull air through the Radiator on certain cars they can be mounted to push air through The radiator. It pushes 3,300 Cfm’s through the radiator set it to come on at about 170 degrees, we use this system when we test our engines most of our engines run about 180 degrees, Important wire fan with a 10 gauge wire.
- Many late model Fords and GM that use a single belt serpentine system They use a reverse turn water pump be careful if a water pump has been replaced. also be sure if you are using a thermostatic fan clutch be sure that the fan is pulling air through the radiator an easy test is to put a news paper on the front of the radiator it should pull tight up against the radiator, of course your radiator must feel warm from top to bottom to be sure it is cooling Properly. Remember the water pump sucks coolant from the bottom of the radiator circulates coolant through the block and heads then returns it up through the thermostat and back into the top of the radiator. Use a heat gun to see if the radiator is working properly coolant will be hotter at the top cooler at the bottom.
- Here is a handy item that mounts at the highest point on your upper radiator hose cut the upper hose and install this Moroso # 63730 filler neck be sure to use with a 16 Lb. radiator cap it allows you to easily be sure the entire block is filled to the top.
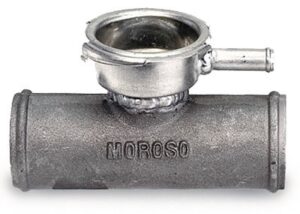
Also available at www.summitracing.com
16. Is It A Valve Tap Or Header Gasket?
Over the years we have found out that valve tapping is misdiagnosed 90 % of the time the header gaskets shrink up and give you that typewriter sound so please read below and check closely. Also if a vehicle isn’t driven on a daily basis moisture collects in the valve lifters and the plungers in the lifters will stick because rust forms on the them. Best to change oil and filter and take the vehicle for a good ride and see if it gets better, if it does then start putting some miles on it weekly. Try to stay away from gas that has an Ethanol blend it is terrible for classic vehicles because it collects moisture.
Engine sounds like a valve tap but it could Be a Header Gasket leaking.
Here is what usually happens after about 500 miles the header gaskets shrinks up and starts to leak especially when the vehicle is cold. Easiest way to diagnose a Header gasket leak is to get a big bath towel start the engine up cold and hold the towel over the area that you hear the noise coming from if the noise changes then most likely it is the Header gasket leaking. You can try to retorque the header bolts to 30 ft. lbs. and if they keep loosening up use # 271 Loctite on the bolts. If the gasket has burnt through then new gaskets are probably necessary.
17. Holley Sniper Tech Help
Your Holley Sniper engine has been live run and properly set up, only use below if you think someone has changed the settings.
(1) Follow prompts on initial set up screen usually set idle setting around 980 rpm. on menu screen.
(2) Start up engine and let idle until coolant temperature must reach 160 F. Set idle screw to 980 rpm if needed for setting timing.
(3) Then set your distributor timing so at 3000 rpm with vacuum advance hose disconnected from distributor. Set timing to 34 degrees BTDC. Then hook the vacuum advance hose back into distributor.
(4) Now shut engine off & turn throttle body idle screw clockwise one full turn .
(5) Then start engine up idle will be at 2000 rpm.
(6) Then very slowly turn ¼ of a turn counterclockwise at a time, open throttle a small amount after each ¼ of a turn, let engine settle down, look at your hand held keep repeating the counterclockwise screw ¼ of a turn counterclockwise to the left, open throttle each time a small amount until on the menu screen the IAC % reading is reading between 8% & 12% that’s it. The computer will learn from there. Here is the video on how to do it. https://youtu.be/V8DtYkMXa4U
Then let engine idle for a minute so computer can learn.
(7) Then restart engine and engine idle should Level off to the setting you set it at from step one. Which was about 980 rpm. That's it.
For Holley Tech line support
1-866-464-6553 http://www.holley.com/sniper2tech
Holley-Sniper-Efi-2-Tech-support.pdf
18. In Tank Fuel Pump best way to go with EFI
The EFI system we will be
Using is the Holley Sniper # 550-511 we will have the hand held all dialed in to use this system. Note Engine Factory does not supply ( fuel tanks or in tank pumps ) you can purchase direct from www.holley.com or www.summitracing.com
This in-tank fuel pump module is a high-pressure unit that flows 255 liters per hour (LPH) and is capable of supporting electronic fuel injection (EFI) engines producing up to 550 horsepower • A pre-calibrated fuel-level sending unit designed to work with the factory fuel gauge for this application is included • This module also features a Hydra Mat filter which has a unique internal reservoir that keeps fuel available at the pick-up and also provides protection from contaminates Fuel pressure is internally regulated to 58 psi eliminating the added expense and effort of purchasing and installing an external fuel pressure regulator - no separate return line is required because this module returns excess fuel right inside the tank! This 1964-70 Mustang Muscle Car EFI Fuel Pump module was designed as a direct replacement for your factory pick-up and sending unit. There is no need to purchase a custom EFI fuel tank. You can even retain the factory fuel hard line - just connect the outlet of the pump module to the hard line on your vehicle with EFI-rated fuel hose and hose clamps available in the Earls Vapor Guard line. This Muscle Car EFI Module includes a 255 LPH fuel pump and a Holley Hydra Mat. Hydra Mat is an amazing patent-pending fuel reservoir system that reduces fuel starvation issues that might otherwise occur while cornering, accelerating, stopping, traversing inclines, and during low fuel conditions. This new kit has all of the extra components to fit all three sizes of Mustang fuel tanks from 1964-1970. You choose which fuel gauge float arm for your factory fuel tank size! Fitment:
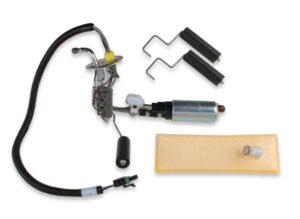
HOLLEY 255 LPH OE STYLE EFI FUEL TANK MODULES
1964-1970 Mustang;
Product Type
- Fuel Pump Module
PART# 12-305
$398.00 SUGGESTED RETAIL
$357.95 YOUR PRICE
19. Customers switching from Carb To EFI
Info before you switch from a Carb to an EFI engine system. Here is the problem YOUR Camshaft may not EFI compatible, yes switching over to EFI sounds Good, but with Camshaft that is in your engine you will find it difficult to Tune, In other words you would have a hard time to get the engine to run smooth, EFI systems require a camshaft that has a 114 lobe separation yours is most likely a 110, So unless you Plan to change the Camshaft You may want to rethink that plan, if you have a good Mechanic it can be done but the key words here are ( GOOD MECHANIC )
Regards,
Bruce
20. What other parts should I replace or upgrade before installing the engine?
This can be a huge list but one of the most important ones to mention would be the Radiator. Use a brand new Aluminum or 3 to 4 core Radiator to keep your replacement engine cool. Some other items would include Engine and Transmission Mounts, Clutch, Torque converter, Fan, belts, hoses, U-Joints, pulleys, hoses and clamps, fuel lines, sensors etc. Reference our installation tips list along with and review each tag on the engine. If you don’t feel comfortable to take this on then contact a qualified mechanic. Early model vehicles with drum brakes should be converted to disc brakes when installing a high performance engine. Most serpentine system require using an electric Fan the Flex lite 180 series puts out 3300 cfm and will keep your engine nice and cool.
21. Fan Clearance Issue
Occasionally we have a customer call saying on his Serpentine system it leaves no room to install an electric fan. I have seen it before on certain applications sometimes if you have installed a 4 core radiator it is to wide leaving no room, www.proformparts.com has slim fit electric fans. if that won’t work Here is the easiest fix. forget about the electric fan and install a Flex Fan it only needs less than 2 inches of clearance. note fans are available in standard or reverse rotation You must First determine which direction your water pump is turning either clockwise, or counter clockwise, Flex Fans can be ordered from www.summitracing.com To install the Flex fan remove the 4 Allen screws and the chrome nose cover from the front of the water pump, install the new Flex fan with correct length bolts with flat and lock washers this will give you the clearance you need. Check all clearances before starting engine.
22. Things to do if your engine sits for more than a year
If your engine installation looks like it will be more than 6 months it is best to prep your engine to Help prevent problems down the road, the first issue you should know when the engine block sits for a long time the block will start to rust out inside and it will continue to eat away at the casting and water pump, when the engine is first started this rust will pump into your new radiator and cooling system, Here is the best way to prevent that, Have 2 gallons of a good brand of antifreeze and 1 quart of rust Preventative, Clamp on a 2 foot long Radiator hose on the large inlet on your water pump, Have a clamp ready to install on the other end of the 2 foot hose, Block off any heater hose fittings, now hold up the Hose and slowly pour in 2 gallons of antifreeze and rust preventative into the block, when the hose fills up, slip the hose onto the upper thermostat housing and clamp off, your cooling system will be protected.
Before you start the engine do the following.
Top off Oil with a good quality Brand SAE 10W 30 oil fill until the dip stick says full, disconnect coil wire at your coil, be sure you have a working oil pressure gauge, spin the engine over for about 20 seconds you should see oil Pressure starting to come up, Now reinstall the coil wire in your coil, when you are ready to start your engine be sure there is fresh fuel in the gas tank, start the engine it should fire and run on fast idle at about 2,000 rpms IMPORTANT Monitor the oil pressure it should come up immediately. I am sure if it had oil pressure when it was stored away no reason it wouldn’t have it now, top off cooling system and monitor temp and then road test.
23. Chevy Flywheel Size, Clutch Size, and Starter Compatibility
Chevy Flywheels and starters compatibility
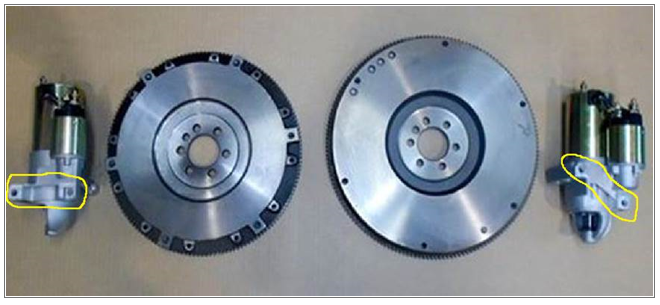
Flywheel and starter on the left is 153 tooth and the compatible starter has bolt pattern straight across from each other; this flywheel uses a 10.5 inch Clutch; Starter can be ordered from www.summitracing.com Search Item PowerMaster PWM-3631
Flywheel and starter on the right is 168 tooth and the compatible starter has the bolts staggered across from each other; this flywheel uses a 11 inch clutch. Starter can be ordered from www.summitracing.com Search Item PowerMaster PWM-3510
See important technical item below.
The starter bolts are special and also the engine block is special where the starter bolts seat >>> When you get your starter off always look at how the engine block has the starter bolt holes recessed up in the block again the threads in the block should be recessed up in the block about 3/8 of an engine this allows the shoulder that is built on the starter bolts to fit up in that recess precisely that is what gives the bolts the strength and keeps everything in perfect alignment.
24. Chevy flexplate and starter compatibility
Chevy flexplate and starter compatibility: both have Balance weights 86-96 when they bolt up be sure weight goes to the front of the engine.
Also, years that have these combos please consider that over the years Chevy engines have been transplanted into just about every combination out there. A quick way to tell what size flywheel you have is to look closely at starter bolt configuration and compare to my illustrations.
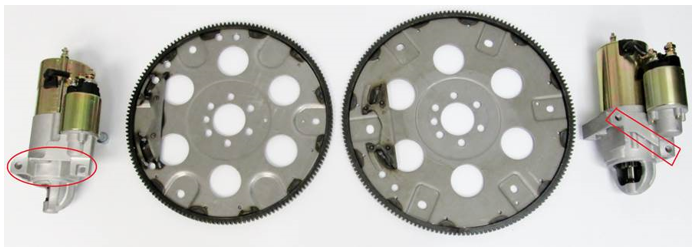
Flexplate and starter on the left is 153 tooth and the compatible starter has bolt pattern straight across from each other.
- This starter Brand is a WAI-GLOBAL Part Number 3631N-PG you can order direct from Rock Auto.
Flexplate and starter on the right is 168 tooth and the compatible starter has the bolts staggered across from each other.
- This starter Brand is a WAI GLOBAL Part Number 6449NM You can order direct from Rock Auto.
See important technical item below:
Camaros
68-83 Camaros had 168 tooth flywheels
84-93 Camaros had 153 tooth flywheels.
Corvettes
67 and earlier Corvettes had 153 tooth flywheels.
68-83 Corvettes had 168 tooth flywheels
84-93 Corvettes had 153 tooth flywheels
If a customer’s torque converter does not bolt up to flexplate then they will need the torque converter that has multiple bolt holes.
The starter bolts are special and also the engine block is special where the starter bolts seat >>> When you get your starter off always look at how the engine block has the starter bolt holes recessed up in the block again the threads in the block should be recessed up in the block about 3/8 of an engine this allows the shoulder that is built on the starter bolts to fit up in that recess precisely that is what gives the bolts the strength and keeps everything in perfect alignment.
25. Power Steering & AC line kits
Power steering & AC line kits Available at www.gottashow.com Phone: 602-237-4506
Note: Some kits will require custom AC & PS lines the company above will assist you on these items.
A.C. Compressor: Sandon Compressor accepts R134A Refrigerant.
NOTE COMPRESSOR HAS OIL IN IT
Note: if the fitting on back of our PS pump is not compatible with your PS pressure line, the fittings on back of both PS pumps will interchange, Just switch the fittings they just thread out. Order a new PS pressure line for a 1971 Chevy impala that will work with our pump.
26. Engine Test w/Headers
When we test your engine, we test with Headers on.
Many people will ask is it ok to use cast iron Exhaust Manifolds, yes absolutely Many people do it with great success.
27. Oil pan Clearance issue with Rack and Pinion on Mustangs
When extra Pan Clearance to Rack and Pinion is needed
Special Notes Adjustable Motor mounts call 888-299-6688 Stang-Aholics
Whether working out exhaust or transmission clearance issues, or altering the engine position for improved weight distribution on your 1965-70 Mustang or Cougar, a new set of adjustable small-block motor mounts from Total Control Products may be just what you’re looking for. The engine-mount plate features a long slot enabling the motor to be moved over three inches fore-aft before locking the position with Grade 8 mounting hardware and clamp washer. Each mount features graphite impregnated polyurethane bushings with a seamless internal sleeve and external housing. Transferred vibration is increased over factory levels but without the harshness commonly found using completely solid mounts. Mount sets include zinc-plated frame adapters and mounts with bushings, and Grade 8 mounting hardware.
Also available Through CJ Pony Parts Ron Morris Brand # MM6110/
28. CVF Racing Ford Belt Length Chart
302Ford, 351w Ford Wraptor pulley kit
AC, alternator, GM Saginaw power steering pump passenger side lower hose water pump Gates 8 Rib Belt # K080774 77 3/4 Long
302Ford, 351w Ford Wraptor pulley kit AC, Alternator, GM Type 2 Power steering pump W/Remote Reservoir Passenger side lower hose Gates 8 Rib Belt #K080751 75 5/8 Long
351W Ford High mount Alternator Gates 8 Rib Belt # K080458 46 3/8 Long W/ Belt tensioner in upper triangle bracket & adjustment Rod extension upside down.
302 Ford High mount Alternator & High mount Gm Saginaw power steering pump Gates 8 Rib Belt # K080635 64 1/4 Long
302Ford, 351w Ford Wraptor AC, Alternator, GM Saginaw power steering pump Driver side lower hose Gates 8 Rib Belt #K080780 78 5/8 Long
302Ford,351w Ford Wraptor pulley kit Alternator, GM Saginaw power steering pump, AC Delete AC idler pulley Driver side Lower hose Gates 8 Rib Belt #K080780 78 5/8 Long
302Ford Alternator only
Passenger side lower hose 3 Bolt crank pulley Gates 8 Rib Belt # K080375 38 1/8 Long
302Ford,351WFord Wraptor pulley kit 1.5 Shorty water pump Std Rotation Ford # M8501-E351S must change water pump backing plate gasket to Felpro # 35214 install 3 gaskets & Permatex indian shellac on gaskets. Ac delete Gm Saginaw power steering pump, Alternator, Driver side lower hose. Gates 8 Rib Belt #K080765 77 inches.
302Ford 351WFord Wraptor pulley kit 1.5 Shorty water pump Std Rotation Ford # M8501-E351S must change water pump backing plate gasket to Felpro # 35214 install 3 gaskets & Permatex indian shellac on gaskets, AC, Alternator, Gm Type 2 power steering pump Driver side lower hose Gates 8 Rib Belt K080751 75 5/8 Long
351WFord Cobra High mount Alternator & High mount Gm Saginaw power steering pump Gates # K080670 67 1/2 Long Belt
302Ford Alternator & Gm Saginaw power steering pump Foxbody Reverse Rotation water pump Gates # K080635 64 1/4 Long
302Ford,351WFord Wraptor pulley kit 1.5 Shorty water pump Std Rotation Ford # M8501-E351S must change water pump backing plate gasket to Felpro # 35214 install 3 gaskets & Permatex indian shellac on gaskets Alternator only 1.5 Shorty water pump Driver side lower hose Gates # K080626 63 1/8 Long
351 Cleveland Ford Wraptor AC, Alternator, Gm Type 2 Power steering pump W/Remote Reservoir Gates # K080765 77 inches Long
302Ford,351W Ford Wraptor AC ,Alternator only Driver side lower hose Gates # K080635 64 1/4 Long
29. Dyno Testing Versus Live Run
Engine Factory stopped doing Dyno pulls over 10 Years ago, over the years we found them to be very destructive on a freshly built engine, since we stopped doing them, we have virtually eliminated any warranties. We do a 1 hour live run just like it is in your vehicle, we do over 30 different tests just to be sure when your engine arrives it is 100% perfect. We use the best High Performance parts that have a proven record to reach these Horsepower’s ratings at the flywheel.
Regards,
Bruce and Tim
Regards Bruce and Tim
30. MSD Distributor # 83541 Important instructions
MSD Distributor #83541 be sure it has steel gear with roller cam, install 2 blue springs so that advance comes in early, keep air cleaner clear of Ignition wires, because it can get voltage spikes causing ignition disruption and sometime causing Ignition Module to burn out.
We have found it a good idea to be sure you block is properly grounded to vehicle frame, and ground air cleaner to back of cylinder head.
Also Important to read instructions on how to set rev limiter especially if your engine will only reach low RPMs.
31. Holley Sniper II Tech Help
Holley Sniper 2 Efi Installation Menu screen Set up 08 06 25
Click Link to Open
32. HEI Distributor Loses Spark
Inside your Distributor is a piece called the electronic module sometimes it gets a voltage spike and burns out the module, you need the distributor Tune up kit, it is made by www.proformparts.com you can purchase it from www.summitracing.com the part number is 141-796 they ship all over. Some local auto parts store also sell it.
Type of distributor picture below

Regards,
Bruce
33. If you have Purchased an engine that is running the Holley Sniper II system ...
if you have Purchased an engine that is running the Holley Sniper II system along with a small body distributor with MSD coil and the engine fires up and then stops. You need to hook the Yellow lead to the Negative side of the coil, this is where the Holley Sniper EFI II gets Tach signal from. Then the engine will fire up and run fine.
1. What’s the best way to lift the engine?
If the lifting points are Accessible, pickup diagonally from the front Left or Right Front Cylinder Head to the Rear Left or Right Cylinder Head. Otherwise from exhaust port holes in the cylinder Heads. Use a high grade Bolt that does not stick out more than a ½ inch otherwise it will bend up and snap off from the chain or cable causing the engine to fall . USE a heavy duty chain or cable long enough to prevent scratching the Valve covers or damaging the Air Cleaner. Never stand under an engine that is suspended in the air, always ask yourself if it falls where will I be.
2. What grade Oil do you recommend and how often should I change the Oil?
We normally suggest using a high Grade SAE 10W/30 Motor oil along with a ½ pint of a good quality zinc break in oil. After 2 oil changes if you would like to go with a synthetic or blended version then this is O.K. Do an initial oil change after 500 Miles then just every 3000 miles from there. Note on the first oil change your oil will look blacker than normal this is because when we assemble the engine we use a heavy duty Graphite on all Moving parts. Many people will ask how many quarts of oil does my engine hold. We have to tell you that every engine is a little different because we install the oil pan that is Made for the application, many will only take 4 quarts and some as many as 8 quarts. Here is how we want you to do it, on initial oil and filter change, first fill the new oil filter to the top, Then install 3 quarts of oil in the engine, then count how many additional quarts does it take to reach the full mark on the Dipstick, caution do not overfill.
We use Wix Oil filters #51069 on our most popular Chevy engines.
We use WIX oil filters # 51085 on our most Popular Ford engines
3. Engine Break in and Distributor Gear Warning!
Engine Factory will normally do the break in of the camshaft on our Turnkey engines. This is very important because you have to be aware that your distributor gear is Matched to the Camshaft in your engine. You cannot go switching the distributor unless you purchase a complete distributor with a Melanized drive gear. Upon taking your vehicle on the road for the first time stagger the throttle from 30 to 50 MPH several times to get the Piston Rings seated properly. Keep the RPMs under 4000 RPMs for the first 1000 miles.
4. What is the max Redline RPM on this engine?
Keep them under 5800 RPMs. The power starts to drop above this anyway in most Street Engines. You will have all the power you’ll ever need below this level anyway. Going beyond this definitely increases your chances of damaging internal Parts.
5. Your engine runs warm this help
1. Help on any engine running warm First study a typical coolant flow in attachment above.
2. Use a Stant #2000-160 it has a little air vent Hole built into thermostat it allows air to get out of block. put the air pintle at 12:00 o'clock position.
3. Install your temperature sender in the Intake water port, ON Chevy’s put it in the Left cylinder head.
a)Do not put sender in the thermostat housing it give a false reading those ports are for vacuum switches.
4. THIS IS THE BEST ELECTRIC FAN IT HAS A THERMOSTATIC ADJUSTABLE SWITCH THAT THE PROBE JUST PUSHES THREW
- THE RADIATOR CORE NO TEMPERATURE SWITCH NECESSARY. Part # FLX-185 Order by model www.summitracing.com
- Be sure to Installed to pull air through the Radiator on certain cars they can be mounted to push air through
- The radiator. It pushes 3,000 Cfm’s through the radiator set it to come on at about 170 degrees, we use
- This system, when we test our engines most of our engines run about 180 degrees, wire fan with a 10 gauge wire.
5. Many late model Fords and GM that use a single belt serpentine system use a reverse turn water pump be careful
- If a water pump has been replaced also be sure if you are using a thermostatic fan clutch be sure that the fan
- Is pulling air through the radiator an easy test is to put a newspaper on the front of the radiator it should pull
- Tight up against the radiator, of course your radiator must feel warm from top to bottom to be sure it is cooling Properly.
6. Here is a handy item that mounts at the highest point on your upper radiator hose cut the upper hose and install this Moroso # 63730 filler neck be sure to use with a 16 Lb. radiator cap it allow you to easily be sure the entire block is filled. Also available at www.summitracing.com
6. Best way to Set Your timing the way Racers do
Clean Off the timing pointer.
Clean off the Balancer we usually mark 15 and 34 degrees on it.
Warm up engine
Hook up your timing light.
Pull vacuum line off the distributor vacuum advance.
Bring RPM’s up to 3,000 and hold steady.
The Mark on your timing pointer should line up with the 34 degree mark on the Balancer.
Adjust if necessary.
Hook up the vacuum advance hose, timing will be correct at all rpm’s
We hook up the vacuum advance this way because it helps to give a much better throttle
Response and a better idle.
7. How do I wire my Small Body Distributor?
Ignition Module for Ford 3 wire distributors from www.summitracing.com
If your vehicle has lost spark you may need this Module #850206-1, it fits Summit distributor #850303-1
Your Electronic small body Distributor will have 3 wires coming out of it:
- Red goes to Positive on the Coil
- Orange wire goes to Negative on the Coil
- Black goes to Ground.
You need 12 Volts Coming from your Ignition switch, both Crank and run position, that works on and off with the Key.
Also, a word of warning, never hook up an electric fan on the same wire that powers your distributor, it must be on a separate circuit coming from your fuse box. Here is what can happen if you shut off the engine and fan is still spinning it acts like a generator and sends a voltage spike back to your Distributor and it can burn out the module in the distributor giving you a no spark condition.
8. One Wire Alternators
The CSI ( Charging Circuit Integrated ) alternators that we use are 140 Amp, They are used around the world. they only require a 6 gauge wire from the Alternator to the Positive terminal on Your Battery, no other wires or plugs should be used. There are so many Aftermarket wire harnesses’ out there most of them are universal Harnesses, they should not be hooked up to a ( one wire Alternator ) These CSI Alternator systems are Isolated and work on their own.
Just run a 6 gauge wire from the terminal with the nut on the alternator to the positive Battery terminal the engine will start and charge the Battery at 14.2 volts. you will need to hook up a separate voltmeter under your dash to monitor your charging system.
You should also be sure when they installed your engine, that your engine must have a 4 gauge heavy duty ground wire from the engine block to the vehicles frame.
9. How do I hook up my starter and solenoid wiring on FFR vehicles

Click image to enlarge
10. When going from a Points style distributor you need to wire an HEI distributor differently
GM HEI wiring terminals
Here are the part Numbers you can order from www.summitracing.com although most auto parts store will also have them many different brands >>>> be sure to tell the guys the Power lead must be hooked up to the Ignition terminal so that the distributor has 12 volts with the key on and no voltage with the key off. Never hook up to the same wire that powers an electric fan or the automatic choke
Painless Wiring 30809 - Painless Performance HEI Power Pigtails
Compare
HEI Power Pigtail, GM HEI Distributors, Each
Part Number: PRF-30809
Painless Wiring 30813 - Painless Performance HEI Tachometer Lead Pigtails
Compare
Wiring Harness, HEI Tachometer Lead, 6 ft. Length, Each
Part Number: PRF-30813
11. Electrical issues many people don’t do and have constant electrical issues.
Very important to follow these instructions:
Distributor and Electric Choke positive terminals must be hooked up to separate 12 volt key controlled (on and off with key ) If you use an electric fan it must be hooked up to a separate circuit otherwise it can burn out the ignition module in the distributor. Here is why if you shut the vehicle off and the fan is still spinning the fan acts like a generator and sends back a voltage spike that instantly burns out the Ignition Module in the distributor.
Also be sure to have a heavy duty 4 Gauge Ground cable going from the engine block to the vehicle frame otherwise you will constantly be adding water to your battery and your alternator will be spiking voltage at 18 volts.
Most auto parts stores have a simple piece that plugs into your fuse panel and adds 4 separate key controlled circuits that plugs into the accessory circuit.
12. Tech Help For Spark Plugs Fouling Out, And Or Raw Gas Smell Out Of The Tail Pipe
In about 90 % of the cases it usually comes down to two issues, It can be the choke is Binding or it has not been wired correctly, the electric choke must have 12 volts whenever the engine is running. Start with the engine cold overnight, push the gas pedal to half throttle to set the choke it should snap shut, now let’s remove the air cleaner Lid only, look to see that choke butterfly is now closed, check to see if it is opening and closing smoothly by pushing the top butterfly open and closed with your finger it should open and close easily without any binding, sometimes we have to use a plastic spacer for the Air cleaner to clear the Distributor they are very touchy if they are not put back on correctly they will bind up the choke mechanism, now start the Vehicle it should go on fast idle and the choke will start to open fully after about 10 minutes of running, If not have a certified mechanic check and repair as necessary.
Another more serious problem is you Have picked up a piece of dirt Or rust in the Carburetor Needle and seats which cause the carb to dump raw gas into the intake, if you have an old fuel tank 10 Years or older by now over the years the tank has collected small amounts of water which turns to rust, water is heavier than fuel so the water and rust settles to the bottom of the tank and is pumped into your Carb or fuel injectors causing a Major flooding problem. If that is the case you will have to have a professional remove the carb and have the needle and seats cleaned by a professional Carb person, or in the case of fuel injectors those would have to be replaced. Engine Factory always recommends replacing a gas tank that is 10 years or older, go online Holley has a good selection of new fuel Tanks
13. Installing Torque converters a must read
Over the years One question that get asked very often How do I know if I have installed my automatic Trans Torque converter Properly?
Now let me say this We are engine Builders Not Transmission builders But over the Years of building our own Cars we learned the right way and the wrong way about installing torque converters on a freshly Built Transmissions, we have found the following Method has always worked well for us.
The first thing Be sure when you order the Torque Converter tell the trans person what Camshaft and Horsepower you have. Are you building a cruiser or Hot street machine because this will determine what stall speed you want for the converter, Most cruisers will stay with a 2,000 stall speed, 400 HP around 2,500, 500 HP & Up will go with 2800 Stall Speed of course if you know your rear end ratio also give that to Transmission shop.
Now when you order your torque converter best to order the converter that has multiple bolt holes where the converter mounts to the engine flexplate, most performance converters normally have the multiple bolt holes.
Ok now when you’re ready to put the converter onto the Trans we always recommend take a look down in the converter and see if you see any trans fluid pour in 1 quart It is best so that it has some lubrication and helps to pick up the pressure faster, now look at the front seal if it looks ok then spread a little of trans fluid on the converter shaft just so the seal has instant lubrication so you don’t burn the seal lips. Now pick up the converter and slide over the trans splined shafts, slowly push into the Transmission and keep rotating the converter you will see it drop back a little that shows it went onto the 1st set of splines now keep turning and pushing back it will then drop back one more time and that means you have dropped back on the second set of splines and have engaged into the Transmission front pump give the converter a spin there should be a nice smooth spin no binding or noise.
Now it is time to mate the Transmission to the Back of your engine, first make sure the Pins that the Transmission line up on don’t have any paint on them, also make sure that the Transmission alignment holes are nice and clean. Now take a couple of Extra 3 inch long bolts and cut the heads off, just thread them into the back of the engine by hand about 3 full turns this will help you to easily slide the trans onto the back of the engine, now have your trans bolts ready to install thread them in by hand and use a hand ratchet, you will now see that the face of the trans and the block are mated together. Now very important reach under and try to spin the torque converter, If you can that means success you now know the Torque converter is installed in the trans correctly, so now is the time to install your converter to flexplate Bolts, you should have about ¼ of an inch space between converter and flexplate that’s perfect, now pull the converter forward until it lines up flush with the flexplate, now install your torque converter bolts nuts and lock washers and torque up everything, now Ford converter use the same procedure except the ford converter have studs that you have to spin the converter to line up the holes into the flexplate. Always be sure you use a new Trans cooler.
14. Intake Power Brake Connection
The image above shows where you hook up power brakes.
you will need these fittings Edelbrock Number 8096 and Edelman # 846260 Order both from
www.summitracing.com There are many other places on the Carb, look at 2nd attachment.
to hook up a vacuum hose going down to the Transmission it needs Vacuum all the time.
These items should be left to a certified mechanic.
15. Tech Help on any engine that runs warm
- Help on any engine running warm First study a typical coolant flow in attachment above.
- Thermostat Use a Stant #2000-160 it has a little air vent Hole built into thermostat it allows air to get out of block. put the air pintle at 12:00 o Clock position.
- Install your temperature sender in the Intake water port, ON Chevy’s put it in the Left cylinder head. Do not put sender in the thermostat housing it give a false reading those ports are for vacuum switches.
- THIS IS THE BEST ELECTRIC FAN, IT HAS A THERMOSTATIC ADJUSTABLE SWITCH THAT THE PROBE JUST PUSHES into THE RADIATOR CORE Part # FLX-185 Order by model summitracing.com be sure to Install it to pull air through the Radiator on certain cars they can be mounted to push air through The radiator. It pushes 3,300 Cfm’s through the radiator set it to come on at about 170 degrees, we use this system when we test our engines most of our engines run about 180 degrees, Important wire fan with a 10 gauge wire.
- Many late model Fords and GM that use a single belt serpentine system They use a reverse turn water pump be careful if a water pump has been replaced. also be sure if you are using a thermostatic fan clutch be sure that the fan is pulling air through the radiator an easy test is to put a news paper on the front of the radiator it should pull tight up against the radiator, of course your radiator must feel warm from top to bottom to be sure it is cooling Properly. Remember the water pump sucks coolant from the bottom of the radiator circulates coolant through the block and heads then returns it up through the thermostat and back into the top of the radiator. Use a heat gun to see if the radiator is working properly coolant will be hotter at the top cooler at the bottom.
- Here is a handy item that mounts at the highest point on your upper radiator hose cut the upper hose and install this Moroso # 63730 filler neck be sure to use with a 16 Lb. radiator cap it allows you to easily be sure the entire block is filled to the top.
Also available at www.summitracing.com
16. Is It A Valve Tap Or Header Gasket?
Over the years we have found out that valve tapping is misdiagnosed 90 % of the time the header gaskets shrink up and give you that typewriter sound so please read below and check closely. Also if a vehicle isn’t driven on a daily basis moisture collects in the valve lifters and the plungers in the lifters will stick because rust forms on the them. Best to change oil and filter and take the vehicle for a good ride and see if it gets better, if it does then start putting some miles on it weekly. Try to stay away from gas that has an Ethanol blend it is terrible for classic vehicles because it collects moisture.
Engine sounds like a valve tap but it could Be a Header Gasket leaking.
Here is what usually happens after about 500 miles the header gaskets shrinks up and starts to leak especially when the vehicle is cold. Easiest way to diagnose a Header gasket leak is to get a big bath towel start the engine up cold and hold the towel over the area that you hear the noise coming from if the noise changes then most likely it is the Header gasket leaking. You can try to retorque the header bolts to 30 ft. lbs. and if they keep loosening up use # 271 Loctite on the bolts. If the gasket has burnt through then new gaskets are probably necessary.
17. Holley Sniper Tech Help
Your Holley Sniper engine has been live run and properly set up, only use below if you think someone has changed the settings.
(1) Follow prompts on initial set up screen usually set idle setting around 980 rpm. on menu screen.
(2) Start up engine and let idle until coolant temperature must reach 160 F. Set idle screw to 980 rpm if needed for setting timing.
(3) Then set your distributor timing so at 3000 rpm with vacuum advance hose disconnected from distributor. Set timing to 34 degrees BTDC. Then hook the vacuum advance hose back into distributor.
(4) Now shut engine off & turn throttle body idle screw clockwise one full turn .
(5) Then start engine up idle will be at 2000 rpm.
(6) Then very slowly turn ¼ of a turn counterclockwise at a time, open throttle a small amount after each ¼ of a turn, let engine settle down, look at your hand held keep repeating the counterclockwise screw ¼ of a turn counterclockwise to the left, open throttle each time a small amount until on the menu screen the IAC % reading is reading between 8% & 12% that’s it. The computer will learn from there. Here is the video on how to do it. https://youtu.be/V8DtYkMXa4U
Then let engine idle for a minute so computer can learn.
(7) Then restart engine and engine idle should Level off to the setting you set it at from step one. Which was about 980 rpm. That's it.
For Holley Tech line support
1-866-464-6553 http://www.holley.com/sniper2tech
Holley-Sniper-Efi-2-Tech-support.pdf
18. In Tank Fuel Pump best way to go with EFI
The EFI system we will be
Using is the Holley Sniper # 550-511 we will have the hand held all dialed in to use this system. Note Engine Factory does not supply ( fuel tanks or in tank pumps ) you can purchase direct from www.holley.com or www.summitracing.com
This in-tank fuel pump module is a high-pressure unit that flows 255 liters per hour (LPH) and is capable of supporting electronic fuel injection (EFI) engines producing up to 550 horsepower • A pre-calibrated fuel-level sending unit designed to work with the factory fuel gauge for this application is included • This module also features a Hydra Mat filter which has a unique internal reservoir that keeps fuel available at the pick-up and also provides protection from contaminates Fuel pressure is internally regulated to 58 psi eliminating the added expense and effort of purchasing and installing an external fuel pressure regulator - no separate return line is required because this module returns excess fuel right inside the tank! This 1964-70 Mustang Muscle Car EFI Fuel Pump module was designed as a direct replacement for your factory pick-up and sending unit. There is no need to purchase a custom EFI fuel tank. You can even retain the factory fuel hard line - just connect the outlet of the pump module to the hard line on your vehicle with EFI-rated fuel hose and hose clamps available in the Earls Vapor Guard line. This Muscle Car EFI Module includes a 255 LPH fuel pump and a Holley Hydra Mat. Hydra Mat is an amazing patent-pending fuel reservoir system that reduces fuel starvation issues that might otherwise occur while cornering, accelerating, stopping, traversing inclines, and during low fuel conditions. This new kit has all of the extra components to fit all three sizes of Mustang fuel tanks from 1964-1970. You choose which fuel gauge float arm for your factory fuel tank size! Fitment:
HOLLEY 255 LPH OE STYLE EFI FUEL TANK MODULES
1964-1970 Mustang;
Product Type
- Fuel Pump Module
PART# 12-305
$398.00 SUGGESTED RETAIL
$357.95 YOUR PRICE
19. Customers switching from Carb To EFI
Info before you switch from a Carb to an EFI engine system. Here is the problem YOUR Camshaft may not EFI compatible, yes switching over to EFI sounds Good, but with Camshaft that is in your engine you will find it difficult to Tune, In other words you would have a hard time to get the engine to run smooth, EFI systems require a camshaft that has a 114 lobe separation yours is most likely a 110, So unless you Plan to change the Camshaft You may want to rethink that plan, if you have a good Mechanic it can be done but the key words here are ( GOOD MECHANIC )
Regards,
Bruce
20. What other parts should I replace or upgrade before installing the engine?
This can be a huge list but one of the most important ones to mention would be the Radiator. Use a brand new Aluminum or 3 to 4 core Radiator to keep your replacement engine cool. Some other items would include Engine and Transmission Mounts, Clutch, Torque converter, Fan, belts, hoses, U-Joints, pulleys, hoses and clamps, fuel lines, sensors etc. Reference our installation tips list along with and review each tag on the engine. If you don’t feel comfortable to take this on then contact a qualified mechanic. Early model vehicles with drum brakes should be converted to disc brakes when installing a high performance engine. Most serpentine system require using an electric Fan the Flex lite 180 series puts out 3300 cfm and will keep your engine nice and cool.
21. Fan Clearance Issue
Occasionally we have a customer call saying on his Serpentine system it leaves no room to install an electric fan. I have seen it before on certain applications sometimes if you have installed a 4 core radiator it is to wide leaving no room, www.proformparts.com has slim fit electric fans. if that won’t work Here is the easiest fix. forget about the electric fan and install a Flex Fan it only needs less than 2 inches of clearance. note fans are available in standard or reverse rotation You must First determine which direction your water pump is turning either clockwise, or counter clockwise, Flex Fans can be ordered from www.summitracing.com To install the Flex fan remove the 4 Allen screws and the chrome nose cover from the front of the water pump, install the new Flex fan with correct length bolts with flat and lock washers this will give you the clearance you need. Check all clearances before starting engine.
22. Things to do if your engine sits for more than a year
If your engine installation looks like it will be more than 6 months it is best to prep your engine to Help prevent problems down the road, the first issue you should know when the engine block sits for a long time the block will start to rust out inside and it will continue to eat away at the casting and water pump, when the engine is first started this rust will pump into your new radiator and cooling system, Here is the best way to prevent that, Have 2 gallons of a good brand of antifreeze and 1 quart of rust Preventative, Clamp on a 2 foot long Radiator hose on the large inlet on your water pump, Have a clamp ready to install on the other end of the 2 foot hose, Block off any heater hose fittings, now hold up the Hose and slowly pour in 2 gallons of antifreeze and rust preventative into the block, when the hose fills up, slip the hose onto the upper thermostat housing and clamp off, your cooling system will be protected.
Before you start the engine do the following.
Top off Oil with a good quality Brand SAE 10W 30 oil fill until the dip stick says full, disconnect coil wire at your coil, be sure you have a working oil pressure gauge, spin the engine over for about 20 seconds you should see oil Pressure starting to come up, Now reinstall the coil wire in your coil, when you are ready to start your engine be sure there is fresh fuel in the gas tank, start the engine it should fire and run on fast idle at about 2,000 rpms IMPORTANT Monitor the oil pressure it should come up immediately. I am sure if it had oil pressure when it was stored away no reason it wouldn’t have it now, top off cooling system and monitor temp and then road test.
23. Chevy Flywheel Size, Clutch Size, and Starter Compatibility
Chevy Flywheels and starters compatibility
Flywheel and starter on the left is 153 tooth and the compatible starter has bolt pattern straight across from each other; this flywheel uses a 10.5 inch Clutch; Starter can be ordered from www.summitracing.com Search Item PowerMaster PWM-3631
Flywheel and starter on the right is 168 tooth and the compatible starter has the bolts staggered across from each other; this flywheel uses a 11 inch clutch. Starter can be ordered from www.summitracing.com Search Item PowerMaster PWM-3510
See important technical item below.
The starter bolts are special and also the engine block is special where the starter bolts seat >>> When you get your starter off always look at how the engine block has the starter bolt holes recessed up in the block again the threads in the block should be recessed up in the block about 3/8 of an engine this allows the shoulder that is built on the starter bolts to fit up in that recess precisely that is what gives the bolts the strength and keeps everything in perfect alignment.
24. Chevy flexplate and starter compatibility
Chevy flexplate and starter compatibility: both have Balance weights 86-96 when they bolt up be sure weight goes to the front of the engine.
Also, years that have these combos please consider that over the years Chevy engines have been transplanted into just about every combination out there. A quick way to tell what size flywheel you have is to look closely at starter bolt configuration and compare to my illustrations.
Flexplate and starter on the left is 153 tooth and the compatible starter has bolt pattern straight across from each other.
- This starter Brand is a WAI-GLOBAL Part Number 3631N-PG you can order direct from Rock Auto.
Flexplate and starter on the right is 168 tooth and the compatible starter has the bolts staggered across from each other.
- This starter Brand is a WAI GLOBAL Part Number 6449NM You can order direct from Rock Auto.
See important technical item below:
Camaros
68-83 Camaros had 168 tooth flywheels
84-93 Camaros had 153 tooth flywheels.
Corvettes
67 and earlier Corvettes had 153 tooth flywheels.
68-83 Corvettes had 168 tooth flywheels
84-93 Corvettes had 153 tooth flywheels
If a customer’s torque converter does not bolt up to flexplate then they will need the torque converter that has multiple bolt holes.
The starter bolts are special and also the engine block is special where the starter bolts seat >>> When you get your starter off always look at how the engine block has the starter bolt holes recessed up in the block again the threads in the block should be recessed up in the block about 3/8 of an engine this allows the shoulder that is built on the starter bolts to fit up in that recess precisely that is what gives the bolts the strength and keeps everything in perfect alignment.
25. Power Steering & AC line kits
Power steering & AC line kits Available at www.gottashow.com Phone: 602-237-4506
Note: Some kits will require custom AC & PS lines the company above will assist you on these items.
A.C. Compressor: Sandon Compressor accepts R134A Refrigerant.
NOTE COMPRESSOR HAS OIL IN IT
Note: if the fitting on back of our PS pump is not compatible with your PS pressure line, the fittings on back of both PS pumps will interchange, Just switch the fittings they just thread out. Order a new PS pressure line for a 1971 Chevy impala that will work with our pump.
26. Engine Test w/Headers
When we test your engine, we test with Headers on.
Many people will ask is it ok to use cast iron Exhaust Manifolds, yes absolutely Many people do it with great success.
27. Oil pan Clearance issue with Rack and Pinion on Mustangs
When extra Pan Clearance to Rack and Pinion is needed
Special Notes Adjustable Motor mounts call 888-299-6688 Stang-Aholics
Whether working out exhaust or transmission clearance issues, or altering the engine position for improved weight distribution on your 1965-70 Mustang or Cougar, a new set of adjustable small-block motor mounts from Total Control Products may be just what you’re looking for. The engine-mount plate features a long slot enabling the motor to be moved over three inches fore-aft before locking the position with Grade 8 mounting hardware and clamp washer. Each mount features graphite impregnated polyurethane bushings with a seamless internal sleeve and external housing. Transferred vibration is increased over factory levels but without the harshness commonly found using completely solid mounts. Mount sets include zinc-plated frame adapters and mounts with bushings, and Grade 8 mounting hardware.
Also available Through CJ Pony Parts Ron Morris Brand # MM6110/
28. CVF Racing Ford Belt Length Chart
302Ford, 351w Ford Wraptor pulley kit
AC, alternator, GM Saginaw power steering pump passenger side lower hose water pump Gates 8 Rib Belt # K080774 77 3/4 Long
302Ford, 351w Ford Wraptor pulley kit AC, Alternator, GM Type 2 Power steering pump W/Remote Reservoir Passenger side lower hose Gates 8 Rib Belt #K080751 75 5/8 Long
351W Ford High mount Alternator Gates 8 Rib Belt # K080458 46 3/8 Long W/ Belt tensioner in upper triangle bracket & adjustment Rod extension upside down.
302 Ford High mount Alternator & High mount Gm Saginaw power steering pump Gates 8 Rib Belt # K080635 64 1/4 Long
302Ford, 351w Ford Wraptor AC, Alternator, GM Saginaw power steering pump Driver side lower hose Gates 8 Rib Belt #K080780 78 5/8 Long
302Ford,351w Ford Wraptor pulley kit Alternator, GM Saginaw power steering pump, AC Delete AC idler pulley Driver side Lower hose Gates 8 Rib Belt #K080780 78 5/8 Long
302Ford Alternator only
Passenger side lower hose 3 Bolt crank pulley Gates 8 Rib Belt # K080375 38 1/8 Long
302Ford,351WFord Wraptor pulley kit 1.5 Shorty water pump Std Rotation Ford # M8501-E351S must change water pump backing plate gasket to Felpro # 35214 install 3 gaskets & Permatex indian shellac on gaskets. Ac delete Gm Saginaw power steering pump, Alternator, Driver side lower hose. Gates 8 Rib Belt #K080765 77 inches.
302Ford 351WFord Wraptor pulley kit 1.5 Shorty water pump Std Rotation Ford # M8501-E351S must change water pump backing plate gasket to Felpro # 35214 install 3 gaskets & Permatex indian shellac on gaskets, AC, Alternator, Gm Type 2 power steering pump Driver side lower hose Gates 8 Rib Belt K080751 75 5/8 Long
351WFord Cobra High mount Alternator & High mount Gm Saginaw power steering pump Gates # K080670 67 1/2 Long Belt
302Ford Alternator & Gm Saginaw power steering pump Foxbody Reverse Rotation water pump Gates # K080635 64 1/4 Long
302Ford,351WFord Wraptor pulley kit 1.5 Shorty water pump Std Rotation Ford # M8501-E351S must change water pump backing plate gasket to Felpro # 35214 install 3 gaskets & Permatex indian shellac on gaskets Alternator only 1.5 Shorty water pump Driver side lower hose Gates # K080626 63 1/8 Long
351 Cleveland Ford Wraptor AC, Alternator, Gm Type 2 Power steering pump W/Remote Reservoir Gates # K080765 77 inches Long
302Ford,351W Ford Wraptor AC ,Alternator only Driver side lower hose Gates # K080635 64 1/4 Long
29. Dyno Testing Versus Live Run
Engine Factory stopped doing Dyno pulls over 10 Years ago, over the years we found them to be very destructive on a freshly built engine, since we stopped doing them, we have virtually eliminated any warranties. We do a 1 hour live run just like it is in your vehicle, we do over 30 different tests just to be sure when your engine arrives it is 100% perfect. We use the best High Performance parts that have a proven record to reach these Horsepower’s ratings at the flywheel.
Regards,
Bruce and Tim
Regards Bruce and Tim
30. MSD Distributor # 83541 Important instructions
MSD Distributor #83541 be sure it has steel gear with roller cam, install 2 blue springs so that advance comes in early, keep air cleaner clear of Ignition wires, because it can get voltage spikes causing ignition disruption and sometime causing Ignition Module to burn out.
We have found it a good idea to be sure you block is properly grounded to vehicle frame, and ground air cleaner to back of cylinder head.
Also Important to read instructions on how to set rev limiter especially if your engine will only reach low RPMs.
31. Holley Sniper II Tech Help
Holley Sniper 2 Efi Installation Menu screen Set up 08 06 25
Click Link to Open
32. HEI Distributor Loses Spark
Inside your Distributor is a piece called the electronic module sometimes it gets a voltage spike and burns out the module, you need the distributor Tune up kit, it is made by www.proformparts.com you can purchase it from www.summitracing.com the part number is 141-796 they ship all over. Some local auto parts store also sell it.
Type of distributor picture below
Regards,
Bruce
33. If you have Purchased an engine that is running the Holley Sniper II system ...
if you have Purchased an engine that is running the Holley Sniper II system along with a small body distributor with MSD coil and the engine fires up and then stops. You need to hook the Yellow lead to the Negative side of the coil, this is where the Holley Sniper EFI II gets Tach signal from. Then the engine will fire up and run fine.